
FANUC Series 0i-MODEL F Plus. CONNECTION MANUAL (FUNCTION) — page 22
1. AXIS CONTROL
B-64693EN-1/01
- 130 -
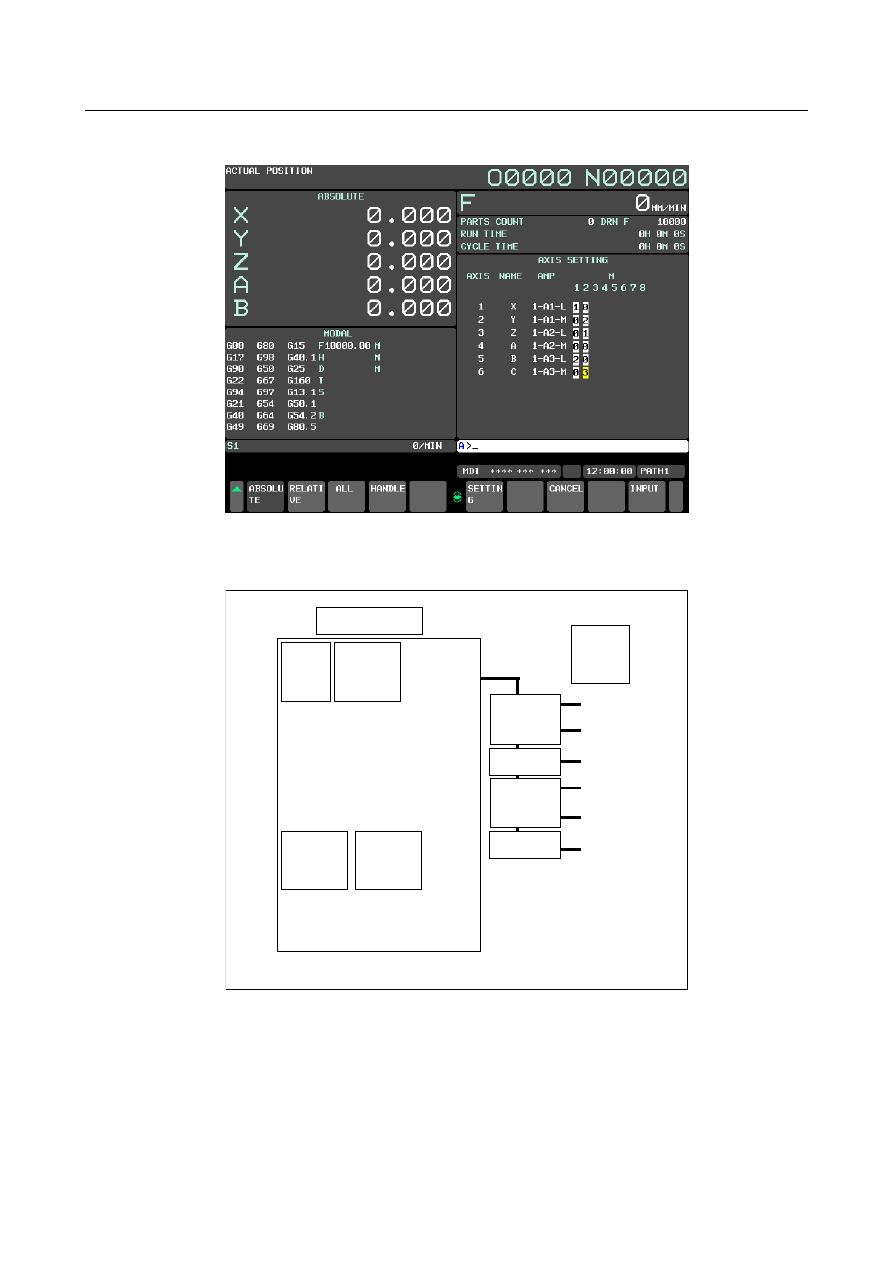
<1> On the axis setting screen, enter 1 in M1 for the X-axis, 2 in M2 for the Y-axis, 1 in M2 for the
Z-axis, 2 in M1 for the B-axis, and 3 in M2 for the C-axis.
<2> Press the soft key [SETTING] to perform FSSB automatic setting.
- Example 3 Cs contour control
X
Y
Z
B
Axis
1
X
2
Y
3
Z
4
A (Cs contour
controlled axis)
5
B
CNC
SV(2 axes)
SV(2 axes)
SV: Servo amplifier
SP: Spindle amplifier
Controlled
axis
number
Program
axis name
No.1020
SP
SP
S1
S2
Spindle
number
1
2
Spindle
name
S1 (Cs contour
controlled axis)
S2
Fig. 1.4.3.2 (g) Setting example (Cs contour control)
B-64693EN-1/01
1. AXIS CONTROL
- 131 -
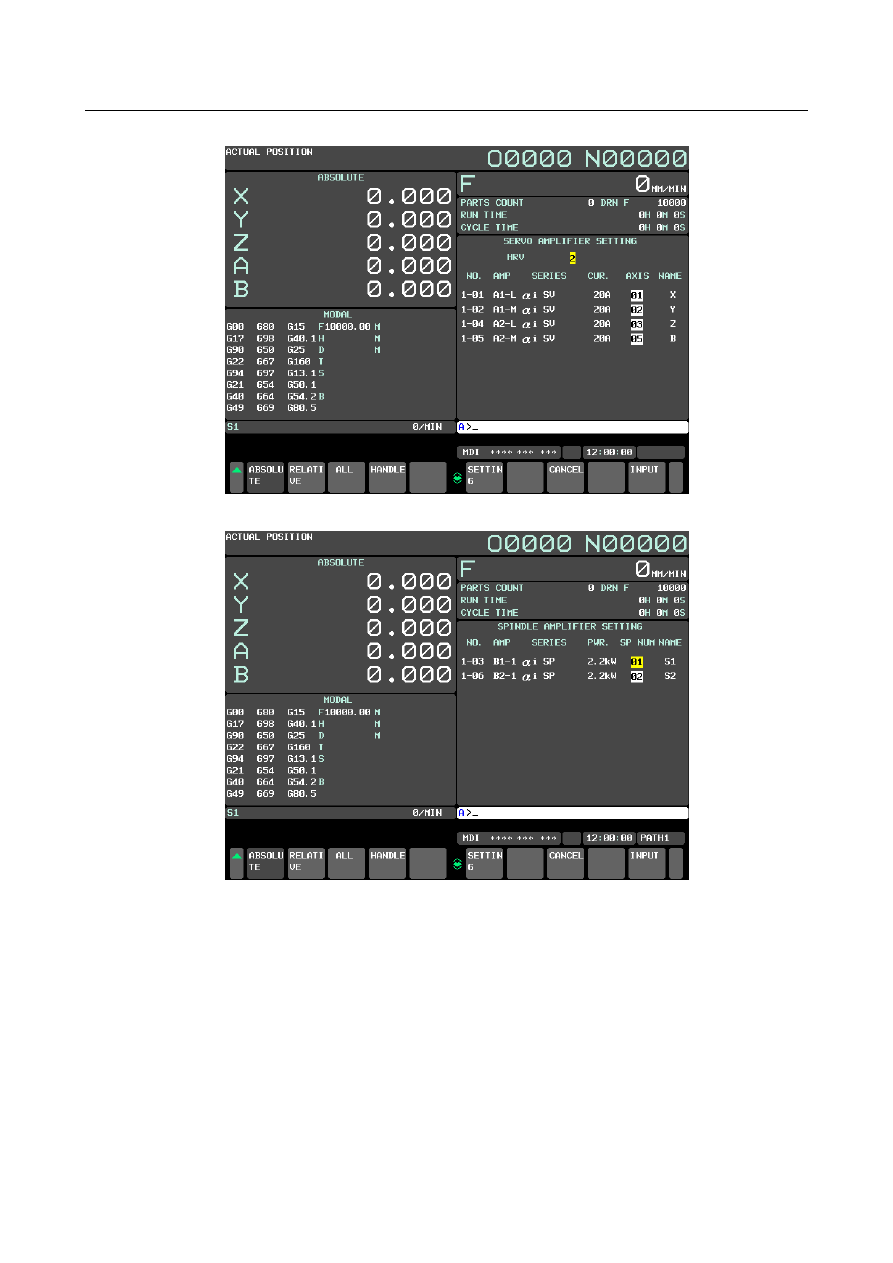
<1> On the servo amplifier setting screen, enter 1, 2, 3, and 5 for AXIS.
<2> On the spindle amplifier setting screen, enter 1 and 2 for SP NUM.
1. AXIS CONTROL
B-64693EN-1/01
- 132 -
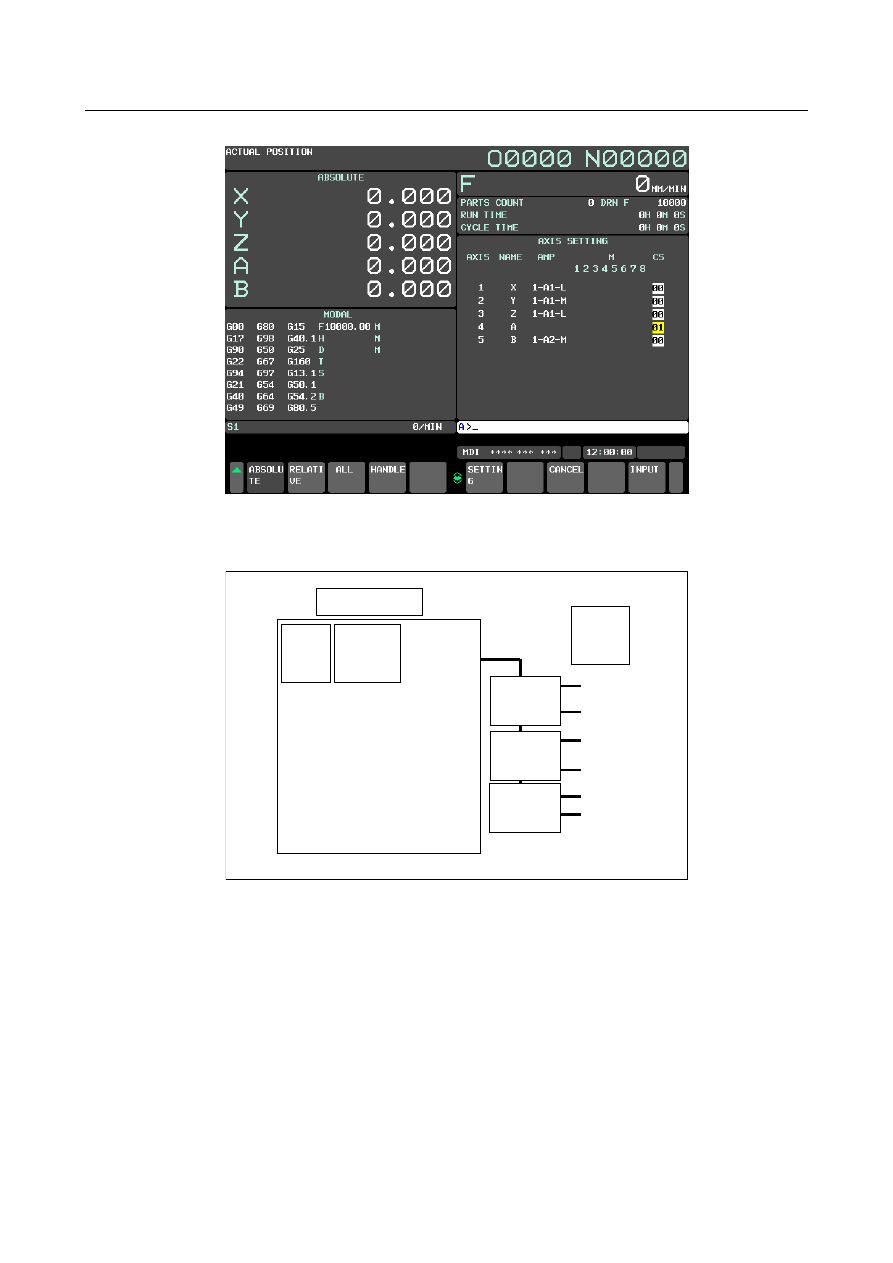
<3> On the axis setting screen, enter 1 in Cs for the A-axis.
<4> Press the soft key [SETTING] to perform FSSB automatic setting.
- Example 4 Tandem control
X
A
Y
B
Z
C
Axis
1
X (tandem master)
2
Y
3
Z
4
A (tandem slave)
5
B
6
C
CNC
SV(2 axes)
SV(2 axes)
Controlled
axis
number
Program
axis name
No.1020
SV(2 axes)
SV: Servo amplifier
Fig. 1.4.3.2 (h) Setting example (tandem control)
B-64693EN-1/01
1. AXIS CONTROL
- 133 -
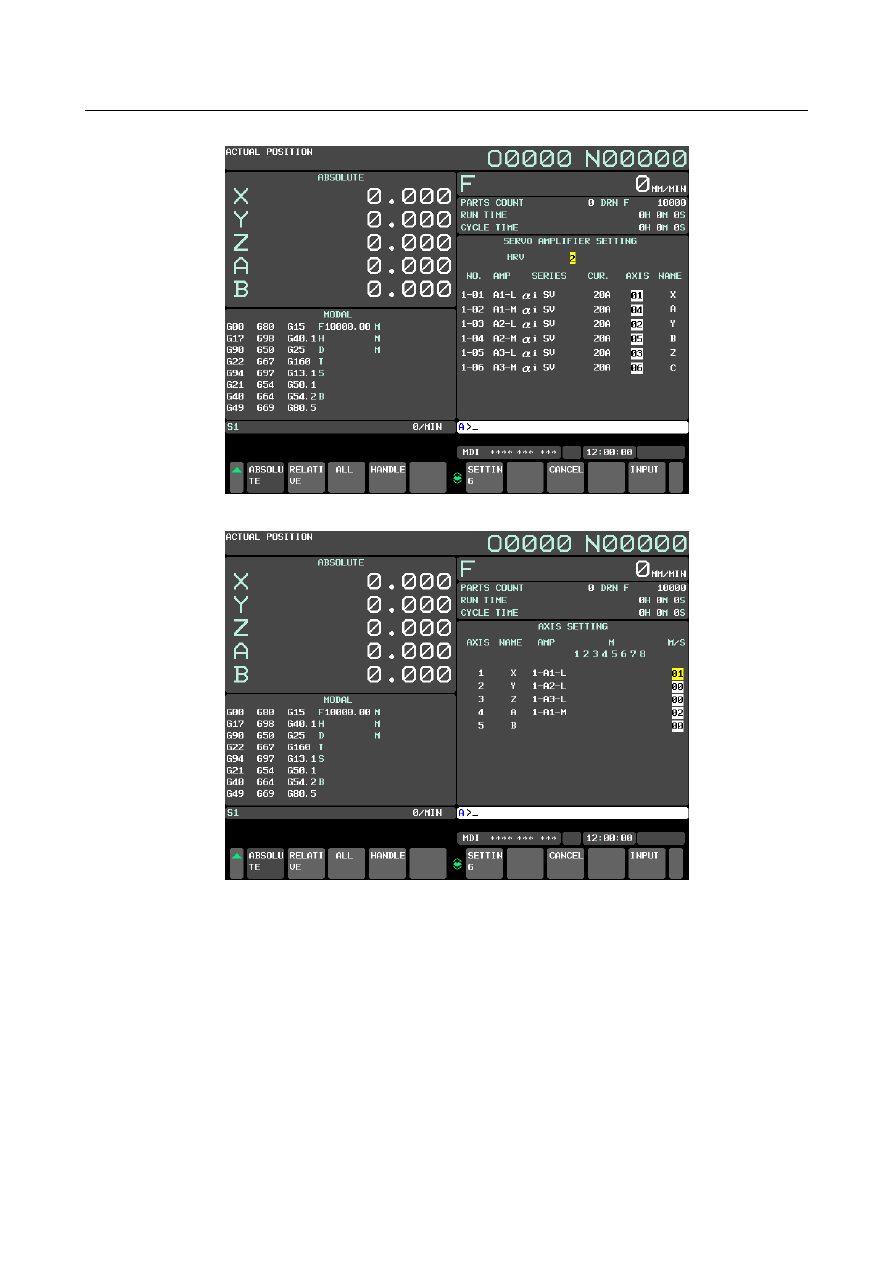
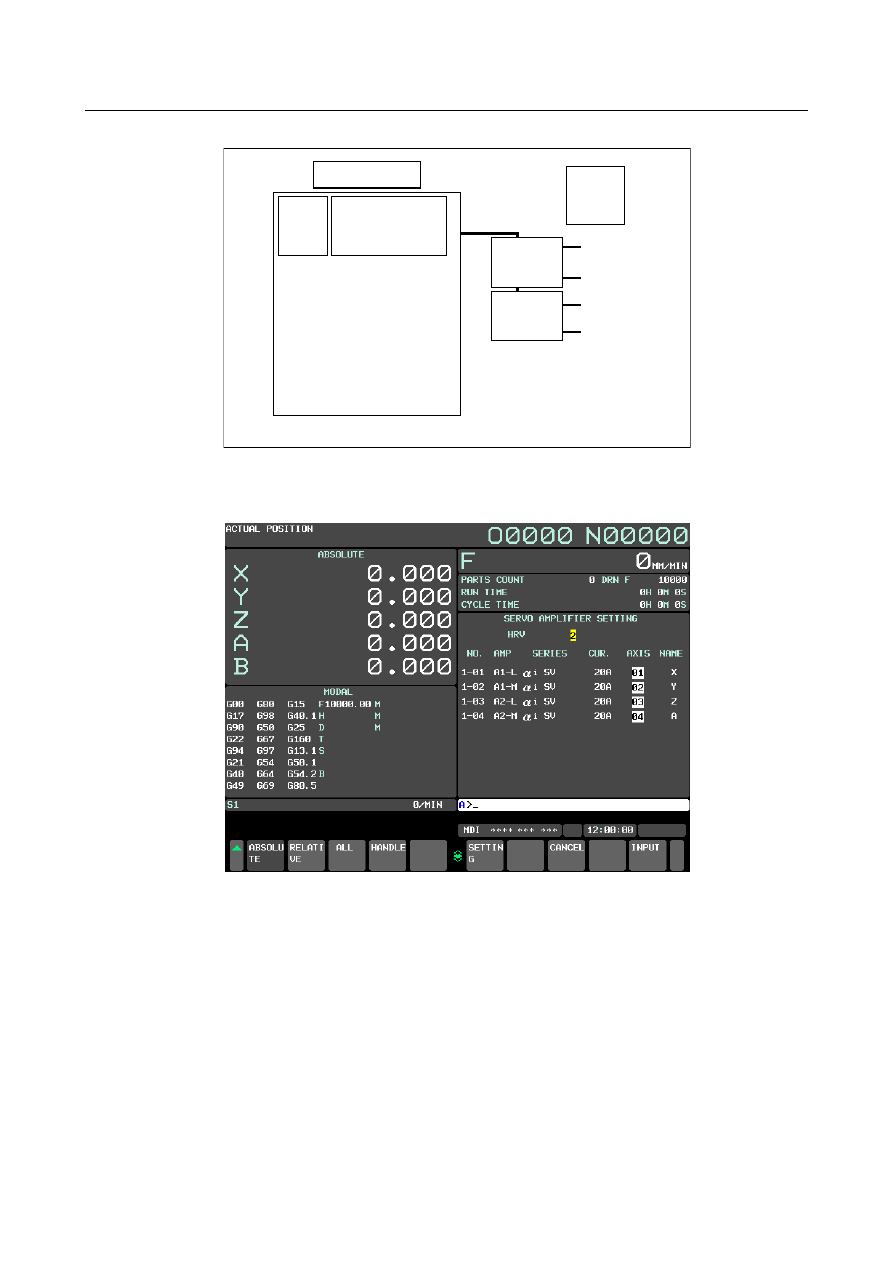
<1> On the servo amplifier setting screen, enter 1, 4, 2, 5, 3, and 6 for AXIS.
<2> On the axis setting screen, enter 1 in M/S for the X-axis and 2 in M/S for the A-axis.
<3> Press the soft key [SETTING] to perform FSSB automatic setting.
1. AXIS CONTROL
B-64693EN-1/01
- 134 -
- Example 5 Electronic gear box
X
Y
Z
A
Axis
1
X (EGB slave)
2
Y
3
Z
4
A
5
B (EGB dummy)
Controlled
axis
number
Program axis
name
No.1020
CNC
SV(2 axes)
SV(2 axes)
SV: Servo amplifier
Fig. 1.4.3.2 (i) Setting example (electronic gear box)
<1> For the X- and B-axes, set bit 0 (SYN) of parameter No. 2011 to 1.
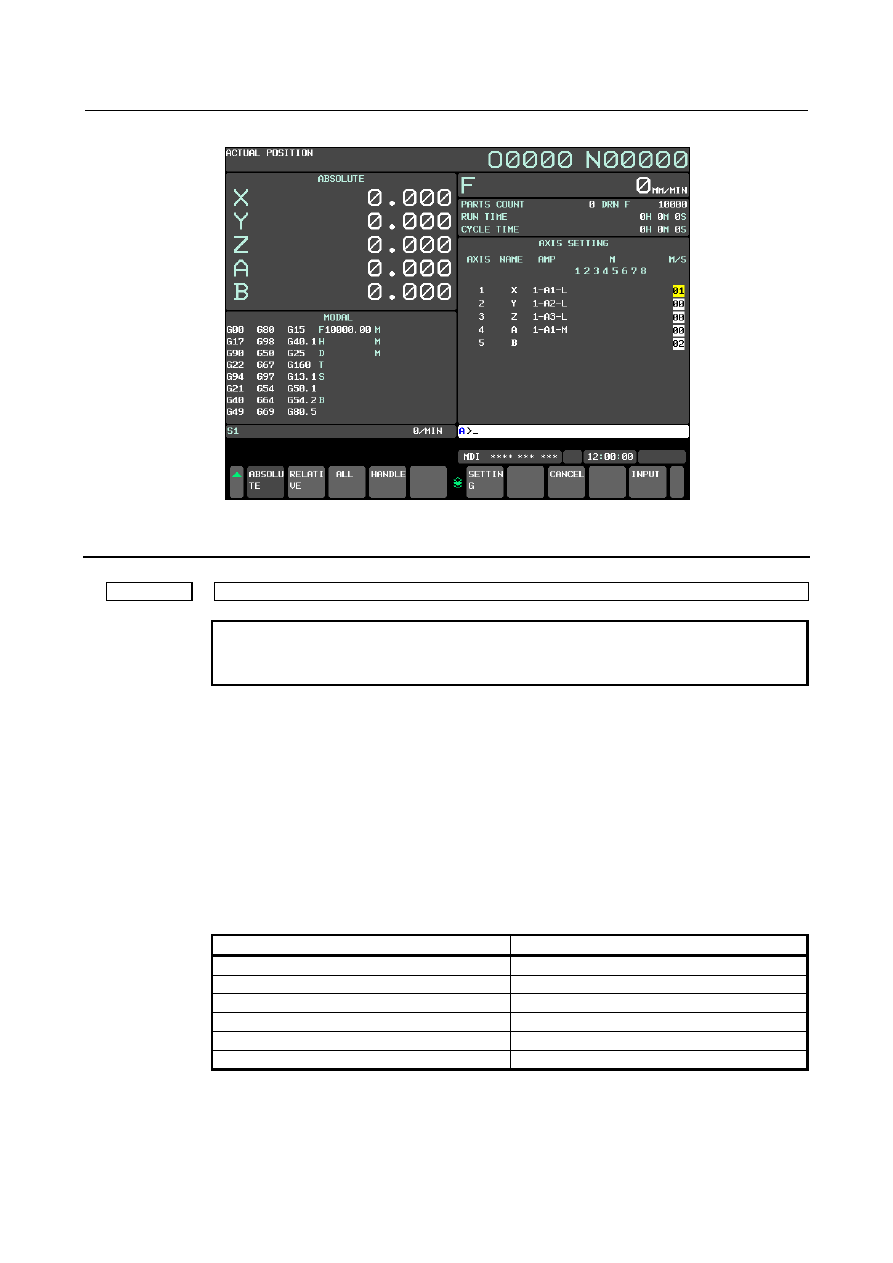
<2> On the servo amplifier setting screen, enter 1, 2, 3, and 4 for AXIS.
B-64693EN-1/01
1. AXIS CONTROL
- 135 -
<3> On the axis setting screen, enter 1 in M/S for the X-axis and 2 in M/S for the B-axis.
<4> Press the soft key [SETTING] to perform FSSB automatic setting.
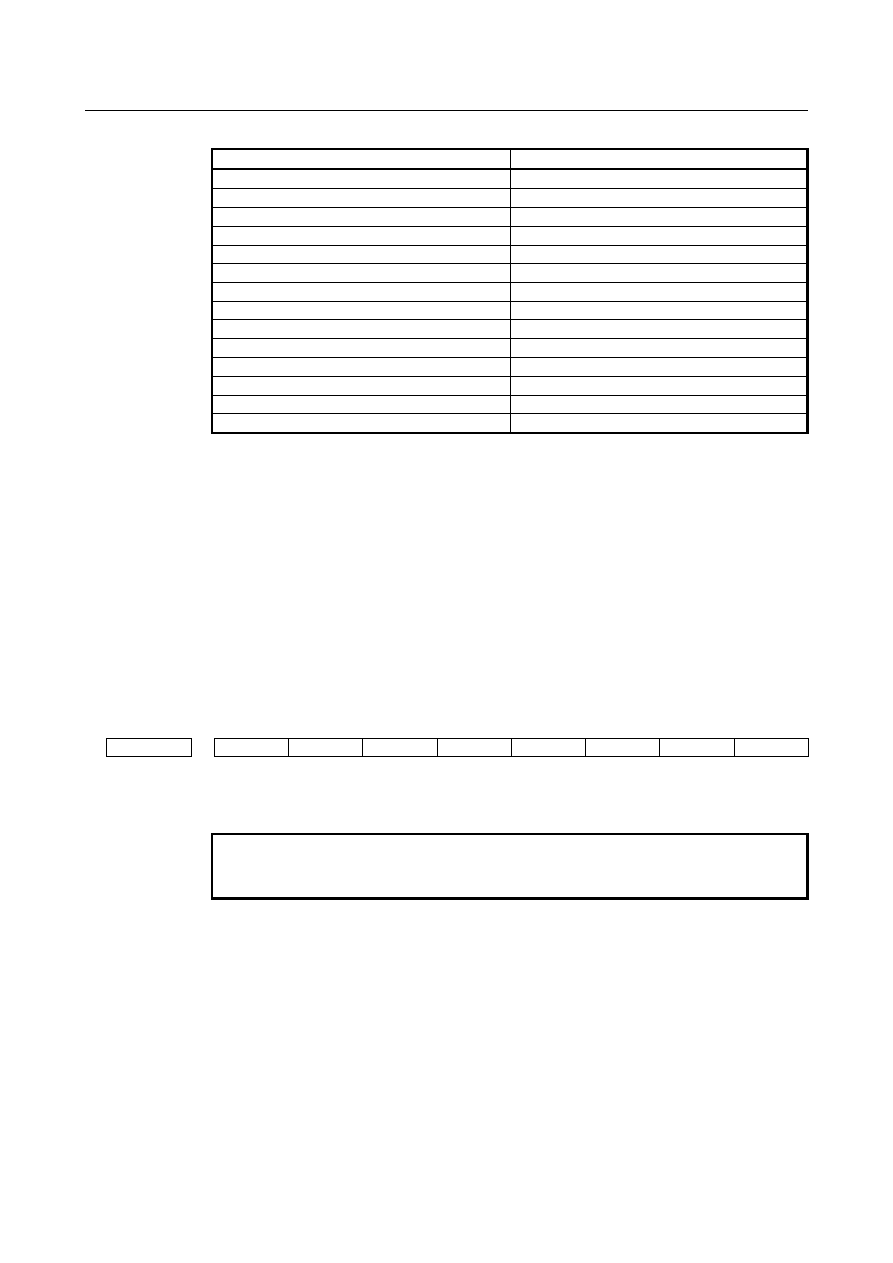
Parameter
1023
Number of the servo axis for each axis
NOTE
When this parameter is set, the power must be turned off before
operation is continued.
[Input type] Parameter input
[Data type] Byte axis
[Valid data range] 0 to 78
This parameter associates each control axis with a specific servo axis. Usually, set the
same number as a controlled axis number and its corresponding servo axis number.
The control axis number is the order number that is used for setting the axis-type
parameters or axis-type machine signals
Any multiple of 8 and the value obtained by subtracting 1 from a multiple of 8 cannot be
set, however. When the number of controlled axes is 7 or more, set numbers with
skipping any multiple of 8 and the value obtained by subtracting 1 from a multiple of 8.
•
Example of setting when the number of controlled axes is 6 or less
Parameter No.1023
Setting value
(1st axis)
1
(2nd axis)
2
(2rd axis)
3
(4th axis)
4
(5th axis)
5
(6th axis)
6
1. AXIS CONTROL
B-64693EN-1/01
- 136 -
•
Example of setting when the number of controlled axes is 7 or more
Parameter No.1023
Setting value
(1st axis)
1
(2nd axis)
2
(2rd axis)
3
(4th axis)
4
(5th axis)
5
(6th axis)
6
(7th axis)
9
(8th axis)
10
(9th axis)
11
(10th axis)
12
(11th axis)
13
(12th axis)
14
(13th axis)
17
(14th axis)
18
•
With an axis for which Cs contour control/spindle positioning is to be performed, set
-(spindle number) as the servo axis number.
Example)
When exercising Cs contour control on the fourth controlled axis by using the
first spindle, set -1.
•
For tandem controlled axes or electronic gear box (EGB) controlled axes, two axes
need to be specified as one pair. So, make a setting as described below.
Tandem axis: For a master axis, set an odd (1, 3, 5, ...) servo axis number. For a
slave axis to be paired, set a value obtained by adding 1 to the value
set for the master axis.
EGB axis: For a slave axis, set an odd (1, 3, 5, ...) servo axis number. For a
dummy axis to be paired, set a value obtained by adding 1 to the value
set for the slave axis.
#7
#6
#5
#4
#3
#2
#1
#0
1902
ASE
FMD
[Input type] Parameter input
[Data type] Bit
NOTE
When at least one of these parameters is set, the power must be
turned off before operation is continued.
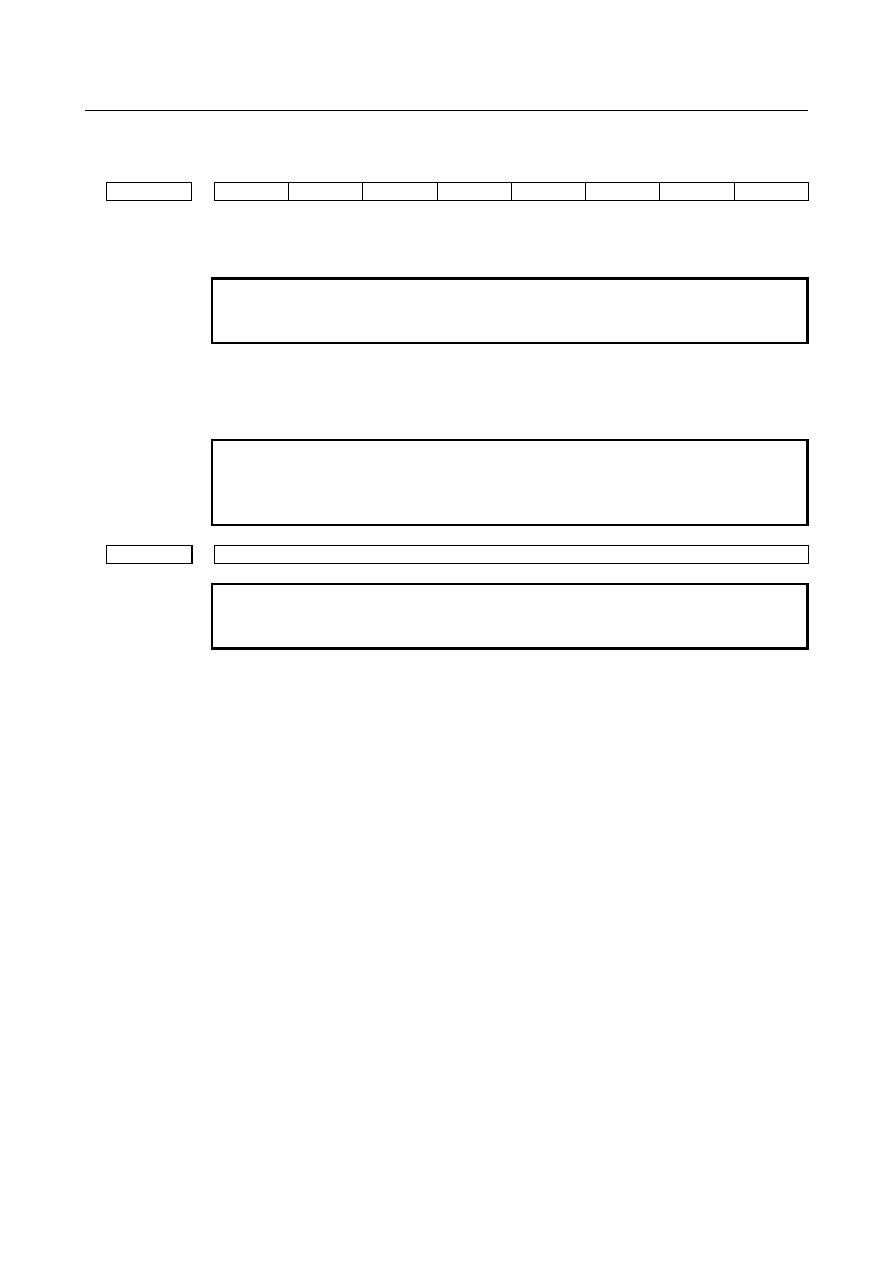
#0 FMD
The FSSB setting mode is:
0: Automatic setting mode.
(When the relationship between an axis and amplifier is defined on the FSSB setting
screen, parameters Nos. 1023, 2013#0, 2014#0, 3717, 11802#4, 24000 to 24103 are
automatically set.
1: Manual setting 2 mode.
(Parameters Nos. 1023, 2013#0, 2014#0, 3717, 11802#4, 24000 to 24103 are to be
manually set.)
#1 ASE
When automatic setting mode is selected for FSSB setting (when the bit 0 (FMD)
parameter No. 1902 is set to 0), automatic setting is:
0: Not completed.
1: Completed.
B-64693EN-1/01
1. AXIS CONTROL
- 137 -
This bit is automatically set to 1 upon the completion of automatic setting.
#7
#6
#5
#4
#3
#2
#1
#0
3716
A/Ss
[Input type] Parameter input
[Data type] Bit spindle
NOTE
When this parameter is set, the power must be turned off before
operation is continued.
#0 A/Ss
Spindle motor type is :
0: Analog spindle.
1: Serial spindle.
NOTE
1 When FSSB setting is used, the setting of serial spindle is required.
2 When a serial spindle is used, enable the spindle serial output (bit 5
(SSN) of parameter No.8133 is 0).
3717
Spindle amplifier number of each spindle
NOTE
When this parameter is set, the power must be turned off before
operation is continued.
[Input type] Parameter input
[Data type] Byte spindle
[Valid data range] 0 to Maximum number of controlled axes
Set a spindle amplifier number to be assigned to each spindle.
0: No spindle amplifier is connected.
1: Spindle motor connected to amplifier number 1 is used.
2: Spindle motor connected to amplifier number 2 is used.
to
n: Spindle motor connected to amplifier number n is used.
Нет комментариевНе стесняйтесь поделиться с нами вашим ценным мнением.
Текст